Descripción general de Notetaker
Note
Notetaker se está implementando gradualmente para los usuarios elegibles. Únete a la lista de espera.
Notetaker proporciona resúmenes generados por IA, transcripciones y tareas para tus reuniones grabadas. Compartibles por email, enlace o archivo TXT descargable, los resúmenes de Notetaker te ayudan a mantenerte organizado y a hacer seguimiento rápidamente.
Por ejemplo, puedes:
- Comparte vídeos de resumen, fragmentos o notas de la reunión, con opción de protección por contraseña
- Pregunta a Notetaker sobre tu reunión para obtener respuestas rápidas a partir de la transcripción de la reunión
- Activa plantillas de resumen adaptadas a tu industria
- Exporta transcripciones como archivos TXT para agilizar la documentación
Antes de comenzar
- Notetaker funciona con Zoom, Google Meet y Microsoft Teams incluso si no eres el organizador o la reunión no está programada a través de Calendly.
- No se crean resúmenes para reuniones de menos de 4 minutos o aquellas sin audio.
Qué esperar cuando Notetaker se una a tus reuniones
- Si eres el organizador: Notetaker se une a tu reunión a la hora programada, solicita el consentimiento para grabar y comienza a grabar una vez admitido o confirmado. Aparece como un participante en la llamada.
- Si no eres el organizador: Notetaker aún se une en tu nombre, pero el organizador debe aprobar la grabación y decidir si admitirla o denegarla. Serás notificado si la reunión se está grabando. Notetaker aparecerá como un participante de la reunión.
Más información sobre lo que sucede cuando Notetaker se une a tus reuniones.
Comprende las notificaciones y los controles de grabación
Notetaker incluye funciones integradas para ayudar a todos a entender cuándo se está grabando una reunión y tomar medidas si es necesario.
Notificaciones de grabación
Cuando Notetaker comienza a grabar, publica un mensaje en el chat de la reunión. Esto informa a todos los asistentes de que la reunión está siendo grabada. Algunas aplicaciones de reuniones también pueden mostrar su propia alerta de grabación.
Detener la grabación en cualquier momento
Cualquier persona en la reunión puede detener la grabación escribiendo /stop en el chat. Los asistentes también pueden pedirle al organizador o al usuario de Calendly que elimine a Notetaker.
Si utilizas la función /stop, la grabación no puede volver a activarse para esa reunión.
Aviso previo
Los asistentes pueden ser notificados antes de la reunión de que Notetaker se unirá y grabará. Puedes activar estas notificaciones por email en tus ajustes de Notetaker.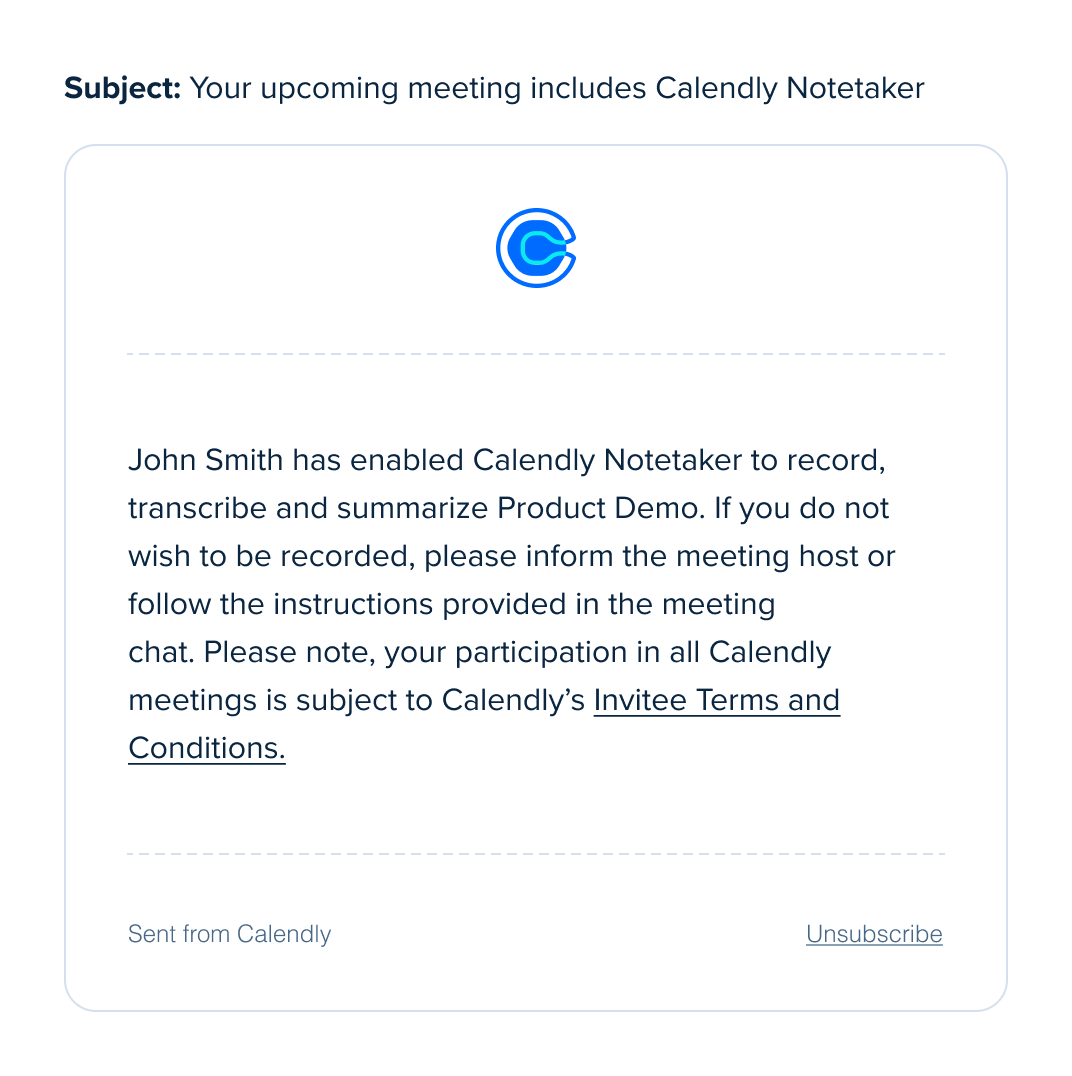
Estas funciones ayudan a que los asistentes estén informados antes y durante la reunión. También ofrecen a todos una forma clara de detener la grabación en cualquier momento.
¿Listo para saber más sobre Notetaker?
- Cómo configurar Notetaker
- Cómo añadir Notetaker a tus reuniones
- Cómo compartir los resúmenes de Notetaker
- Cómo eliminar un resumen de Notetaker
- Qué esperar cuando Notetaker se une a tus reuniones
- Cómo ver las reuniones del calendario en Calendly
- Solución de problemas de Notetaker
Preguntas frecuentes
Nota: Esta función está actualmente en desarrollo y disponible para un grupo limitado de organizaciones pequeñas.
Si Notetaker está disponible para su organización, sí. Propietarios y Administradores pueden desactivar Notetaker para toda la organización.
Para saber cómo hacerlo, siga los pasos en Cómo eliminar Notetaker de las reuniones.
No. El organizador de la reunión debe aprobar a Notetaker en cada nueva reunión de Zoom.
Es posible que vea la opción «Recordar esta elección» en Zoom. Esto solo funciona para la reunión en la que se encuentra. No se aplica a reuniones futuras.
La casilla «Recordar» ayuda si el organizador necesita aprobar más de un Notetaker para grabar una misma reunión. Evita ventanas emergentes adicionales solo en esa sesión.
Para cada nueva reunión de Zoom, el organizador debe aprobar de nuevo a Notetaker. No existe una configuración que permita que Notetaker grabe automáticamente todas las reuniones futuras.
Calendly proporciona notificaciones y controles de grabación para ayudarle a obtener el consentimiento para que Notetaker se una y grabe su reunión.
Usted es responsable de decidir si estas funciones satisfacen sus necesidades de cumplimiento, incluido el RGPD.
En Google Meet y Zoom, algunas configuraciones de administrador pueden bloquear los mensajes de chat de participantes no humanos. Cuando esto ocurre, los asistentes pueden no ver los mensajes de consentimiento de Calendly Notetaker ni la respuesta al comando /stop en el chat de la reunión.
El Notetaker está diseñado para seguir su reunión mientras se desplaza entre la sala principal y las sesiones en salas secundarias.
Así funciona:
- El Notetaker se unirá automáticamente a las salas secundarias cuando sea invitado
- Regresará a la sala principal cuando el organizador cierre las salas secundarias
- Mientras esté en cualquier sala, el Notetaker continúa con su comportamiento habitual, incluyendo abandonar la sala si:
- Todos los participantes salen de la sala
- Hay silencio prolongado
Consejos para una experiencia fluida
- Asegúrese de que el organizador cierre las salas secundarias cuando termine la sesión
- Si es necesario, el organizador puede mover al Notetaker entre salas en cualquier momento
Esta configuración ayuda al Notetaker a mantenerse alineado con el flujo de la reunión, tanto si colaboran en grupos más pequeños como si vuelven a la sesión principal.
Cuando te cambias a una organización de Calendly diferente, tu configuración de Notetaker y tus meeting recaps no se transfieren.
No. Los Recaps permanecen con la organización original y pueden dejar de ser accesibles después de que realice la transferencia.
Descarga los resúmenes de reuniones que quieras conservar y vuelve a activar Notetaker después de unirte a la nueva organización.